Build a complete Simplicity application, from contract to web to wallet
This tutorial builds a complete application in which a Simplicity contract enforces a financial agreement. The agreement is an allowance: a beneficiary can withdraw a specified amount at a time, with a minimum wait between withdrawals, and the benefactor who funded it can't take the coins back. You'll read the contract's code and test it on a local regtest network. Then you'll fund it, withdraw from it and close it on Liquid testnet, once from a web page you can edit and once with the Humid browser wallet. You can adapt the same tools and code patterns for a financial application of your own.
What you need
You'll need git, curl, python3 and a Chromium-compatible browser. The commands are
for a Unix shell on Linux or macOS. Each step that needs another tool installs it or checks
for it.
Architecture
The page doesn't have a backend. It reads the chain from a public Esplora server. It gets each transaction signed in one of two ways: by the LWK library inside the page (Steps 7 to 10), or by the Humid wallet extension, which works from a manifest (Step 11).
flowchart TD
  source["allowance.simf"]
  manifest["txmanifest.humid.json"]
  subgraph page["The page: one HTML file"]
    form["terms, amounts,<br/>buttons"]
    index["indexer:<br/>list UTXOs,<br/>compare depth and balance"]
  end
  subgraph lib["lwk_wasm, loaded by the page"]
    l["compiles the covenant and<br/>derives the address (Steps 6 to 11)<br/>builds and signs (Steps 7 to 10)"]
  end
  subgraph wallet["Humid extension (Step 11)"]
    w["compiles the covenant<br/>builds and signs<br/>asks the user<br/>broadcasts"]
  end
  chain[("Liquid testnet")]
  source --> l
  source --> w
  manifest --> w
  form -->|"terms + amounts"| l
  form -->|"action + params"| w
  l -->|"signed transaction<br/>via Esplora"| chain
  w -->|"signed transaction"| chain
  chain -->|"UTXOs, tip height<br/>via Esplora"| index
  chain -->|"wallet balance<br/>via Esplora"| l
  index -->|"which action is valid now"| form
1. Get the files
You should now be in allowance-web, which holds the contract, the manifests, the worked
examples and the wallet patch. It also holds EXPLANATION.md, on how the
application works and why it's built this way, and REFERENCE.md, with
error messages, the Humid wallet API and setup details. This tutorial links to sections of
both.
Run every command in the rest of this tutorial from allowance-web. If you open another
terminal, cd to allowance-web in it first. This tutorial wraps each command that needs
a different directory in parentheses, so it runs in a subshell there and your shell stays
where it was. If a command fails, look up its message in REFERENCE.md, "Errors and what causes
them".
Open contracts/allowance.simf in your editor or viewer, and
look through it to see what SimplicityHL code looks
like. Every later step builds on this one contract. You don't need to change anything.
For what each function enforces, see
EXPLANATION.md, "What the contract enforces".
2. Run the contract's tests on regtest
Check that you have Rust, installed with rustup
(which provides cargo), as well as a C compiler and jq:
You should see a version from each. rustc should be 1.91 or newer; if it's older, run
rustup update stable. If cc isn't found, install your system's C build tools, such as
build-essential on Debian or Ubuntu, or the Xcode Command Line Tools on macOS with
xcode-select --install. If jq isn't found, install it with your system's package
manager.
Install Simplex, which runs SimplicityHL integration tests
against a local Elements regtest
node that it starts and supplies with test coins. Its installer,
simplexup, uses jq and also installs the regtest tools the tests use. The tests are written for
Simplex 0.2.0, so install that release. Download the installer, read it if you want to,
then run it:
export SIMPLEX_DIR="$HOME/.simplex"
mkdir -p "$SIMPLEX_DIR/bin"
curl -fsSL -o "$SIMPLEX_DIR/bin/simplexup" \
    https://raw.githubusercontent.com/BlockstreamResearch/smplx/master/simplexup/simplexup
chmod +x "$SIMPLEX_DIR/bin/simplexup"
export PATH="$SIMPLEX_DIR/bin:$PATH"
simplexup --install 0.2.0
simplex --version
You should see Simplex 0.2.0. The two export lines apply only to this terminal, so run
them again in any new terminal you use for this step. If you already had a newer Simplex,
REFERENCE.md, "Installing and running
Simplex" explains how to switch back to it.
Then set up the project and run the tests:
simplex init allowance_example
(
  cd allowance_example
  rm tests/p2pk_test.rs simf/p2pk.simf      # init's own sample
  cargo add anyhow@1 smplx-std@0.2.0        # the test needs these
  cp ../examples/allowance-simplex/simf/allowance.simf ./simf/
  cp ../examples/allowance-simplex/tests/allowance_test.rs ./tests/
  simplex build && simplex test
)
You should see both tests PASS:
[...]
    Starting 2 tests across 2 binaries
        PASS [  20.046s] simplex_allowance_example::allowance_test allowance_drains_over_successive_withdrawals__smplx_test
        PASS [   1.564s] simplex_allowance_example::allowance_test withdrawing_before_the_interval_is_rejected__smplx_test
────────────
     Summary [  21.611s] 2 tests run: 2 passed, 0 skipped
Exit Status: 0
The first test runs through a full lifecycle. The second attempts a withdrawal before the timelock, which the node rejects under BIP68.
Next steps, at the end of this tutorial, suggests more tests you can write yourself.
3. Build web page dependencies
Check that you have LLVM clang with the wasm32 target, which this build needs:
If you see MISSING, or clang isn't found, install LLVM and run the check again. On
Linux, install your distribution's clang and llvm packages.
clang on macOS
On macOS, install from brew install llvm, as the system clang doesn't support wasm.
Homebrew doesn't put this LLVM on your PATH, so run this in every terminal you use for
the rest of the tutorial:
Then install wasm-pack and build LWK for wasm with its Simplicity feature, which LWK's own
published builds leave out. LWK is the library the page uses to compile the contract and
build transactions. The wasm-pack
build can take some time, often without printing anything.
cargo install wasm-pack
git clone https://github.com/Blockstream/lwk
(
  cd lwk/lwk_wasm
  wasm-pack build --release --target web --out-dir pkg-web -- --features simplicity
)
When the build finishes, lwk/lwk_wasm/pkg-web/ contains lwk_wasm.js and
lwk_wasm_bg.wasm, the two files the page loads. Copy them:
mkdir -p examples/allowance-lwk/vendor
cp lwk/lwk_wasm/pkg-web/lwk_wasm.js lwk/lwk_wasm/pkg-web/lwk_wasm_bg.wasm \
   examples/allowance-lwk/vendor/
4. Serve the page and fund its wallet
Open a second terminal in allowance-web and start a web server for the page:
You should see Serving HTTP on … port 8099. Leave it running through Step 11, then stop
it with Ctrl-C. If it prints Address already in use, run it again with another port
number and use that port below.
Open http://localhost:8099/. The page doesn't work opened as a file. Keep the same port throughout, because the page stores its wallet and key per origin.
You should see Simplicity API: present under "Library". If the build lacks the
feature, that section instead starts Failed: This build is missing:; redo the build in
Step 3.
The page has its own single-key wallet.
The page stores the mnemonic in plaintext
The page keeps its mnemonic in localStorage in plaintext. Use it only for testnet
funds, and don't paste in a mnemonic from elsewhere.
On the I'm the benefactor tab, leave the mnemonic box blank, press Open wallet, then Request testnet funds.
You should see a balance within about a minute. Press Sync & show balance to check again. If it stays at zero, use the Liquid testnet faucet with the address the page shows.
5. Show the beneficiary's key
Open the I'm the beneficiary tab and press Generate / show my key. This shows the BIP340 x-only public key that the page generated for you when it loaded. The page compiles it into the contract in Step 6, and the contract accepts a withdrawal only with a signature from the matching private key.
You should see 64 hex characters.
In a real allowance, the beneficiary does this on a separate machine and sends the 64 characters to the benefactor. If you're testing on your own, the benefactor's Beneficiary's public key field already holds this key. If you change that field, Use my own key (single-wallet test) on the I'm the benefactor tab restores the key.
6. Set the terms and compile the contract
Open the I'm the benefactor tab and fill in the three values the page compiles into the contract:
- Beneficiary's public key, from Step 5.
- Withdrawable per period, which is
ALLOWANCE_AMOUNTin sats. Keep it well above - The page uses a fixed fee of 500 sats for every withdrawal and pays it out of the allowance, so an allowance of 500 sats or less can't be withdrawn.
- Blocks between withdrawals, which is
MIN_DISTANCE.3means about three minutes, convenient for a first run;1440is about a day.
Press Compile & derive address.
The code behind Compile & derive address
const args = new L.SimplicityArguments()
  .addValue("BENEFICIARY_KEY", L.SimplicityTypedValue.fromU256Hex(params.benkey))
  .addValue("ALLOWANCE_AMOUNT", L.SimplicityTypedValue.fromU64(params.allowance))
  .addValue("MIN_DISTANCE", L.SimplicityTypedValue.fromU16(params.mindist));

const program = L.SimplicityProgram.load(source, args);
const address = program.createP2trAddress(
  L.XOnlyPublicKey.fromString(NUMS_INTERNAL_KEY), network);
You should see the CMR and a tex1p…
covenant address. Changing
any of the terms gives a different allowance at a different address.
7. Fund the allowance
Set the amount to lock to a whole multiple of Withdrawable per period, such as 15000
for an allowance of 5000, so that the last withdrawal also takes a full allowance. Then
press Fund.
The code behind Fund
Broadcast for real is selected, so the page first shows what it will send: the amount, the covenant address, the terms, the fee and the output count. Check them and press Sign & broadcast. To try it without sending anything, clear Broadcast for real before you press Fund; the page then reports the txid it would have sent.
You should see a txid. The transaction's output at the covenant address is the first allowance instance.
Check the funding on chain
You should see one output with scriptpubkey_type v1_p2tr and the value you
locked. Its position among the outputs can vary.
8. Watch the allowance
Steps 8 to 10 follow the loop below; in this step, you watch the chain for live allowance instances. A partial withdrawal pays the beneficiary and recreates the covenant with the remainder, so the timelock starts again from the block that confirmed the withdrawal.
flowchart TD
  start(["your wallet, funded"]) -->|"Fund"| inst
  inst["allowance instance:<br/>one UTXO at the covenant address"]
  inst -->|"wait MIN_DISTANCE blocks"| ready["spendable"]
  ready -->|"PartialWithdraw<br/>balance above ALLOWANCE_AMOUNT"| split
  split["payout to the beneficiary, plus the<br/>remainder back to the same address"] --> inst
  ready -->|"FullWithdraw<br/>balance at or below ALLOWANCE_AMOUNT"| done(["closed"])
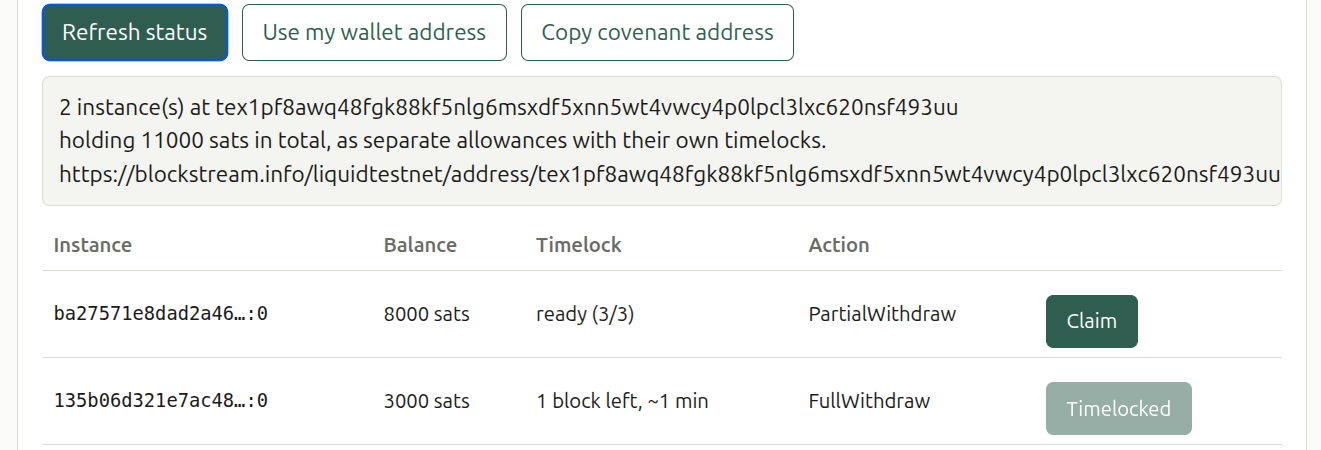
Open the I'm the beneficiary tab and press Refresh status. The instance list and the withdrawal controls are on that tab.
You should see one instance listed with a balance and either PartialWithdraw or
FullWithdraw as its action. Its "Timelock" column reads unconfirmed (~1 min) until the funding
transaction confirms, and then shows a timelock countdown. Each
UTXO at the covenant address is a separate allowance instance
with its own timelock.
Check the instances on chain
ADDR=<covenant-address>
curl -s "https://blockstream.info/liquidtestnet/api/address/$ADDR/utxo" | python3 -m json.tool
curl -s "https://blockstream.info/liquidtestnet/api/blocks/tip/height"
You should see a JSON array with one entry per instance, each with a value and a
status, then the tip height as a bare number. A confirmed
entry has status.block_height; an unconfirmed one has status.confirmed: false and
isn't spendable yet.
Compute depth = tip - block_height + 1; an instance becomes spendable once
depth >= MIN_DISTANCE. The action follows the balance: FullWithdraw when
value <= ALLOWANCE_AMOUNT, otherwise PartialWithdraw.
9. Withdraw
Wait until the button reads Claim. With a short MIN_DISTANCE such as 3, the page
refreshes the list about once a minute; press Refresh status to check sooner.
Press Use my wallet address to set where the payout goes. Then press Claim and read the confirmation panel, which lists every output before the page signs anything.
You should see these outputs:
| Output | PartialWithdraw |
FullWithdraw |
|---|---|---|
| 0 | the remainder, back to the covenant address | the payout to you |
| 1 | the payout to you | the fee |
| 2 | the fee |
Confirm it.
You should see a broadcast txid. After a PartialWithdraw, a new instance holding the
remainder appears within about a minute.
Check the payout on chain
In vout, you should see an output whose scriptpubkey_address is the address in
the payout field. For a PartialWithdraw, its value is ALLOWANCE_AMOUNT minus the
500-sat fee. For a FullWithdraw, it's the instance's whole balance minus the fee.
The last output, with scriptpubkey_type fee, is the fee.
If the claim fails with non-BIP68-final, not enough blocks have passed; wait and claim
again. If it fails with insufficient fee, rejecting replacement, an earlier attempt
already reached the mempool and probably succeeded. For anything else, look up
the message in REFERENCE.md, "Errors and what causes
them".
10. Close the allowance
Repeat Step 9 until the balance is at or below ALLOWANCE_AMOUNT. The action then shows
FullWithdraw, which takes everything remaining and ends the covenant. Claim it the same
way.
After each claim, the page refreshes the list. The button of the instance you just spent shows Spent. The new instance holding the remainder appears as Unconfirmed, then Timelocked, then Claim once its own timelock has passed.
After the FullWithdraw, you should see No live instances at … in place of the list.
Once the FullWithdraw confirms, your payout address holds the locked amount, less the fee
for each withdrawal.
Check the close-out on chain
ADDR=<covenant-address>
PAYOUT=<payout-address>
curl -s "https://blockstream.info/liquidtestnet/api/address/$ADDR/utxo" | python3 -m json.tool
curl -s "https://blockstream.info/liquidtestnet/api/address/$PAYOUT/utxo" | python3 -m json.tool
You should see an empty array for the covenant address: every instance is spent. The
second command's list should include the payouts sent to that address, each value
matching a payout from Steps 9 and 10.
11. Run the same contract through the wallet
Steps 4 to 10 kept the keys in the page. In this step, the page passes the Humid extension the same contract source together with a manifest, which tells Humid how to build each transaction. Humid then signs each one.
This creates a second, separate allowance
Humid signs with its own key, so this allowance gets a new covenant address. In Humid mode, the page can't claim an allowance compiled with the page's own key.
11a. Build the extension
Install Bun, which builds the extension, with
npm. You need Bun 1.3.14 or
newer:
If it prints an older version, a Bun installed another way comes first on your PATH.
Run type -a bun to find it, then update or remove that copy.
Then clone and build Humid 1.1.4. The build:wasm:lwk and build:wasm:smplx scripts can
each take some time, often without printing anything.
git clone --recursive --branch 1.1.4 https://github.com/BlockstreamResearch/humid
(
  cd humid
  bun run build:wasm:lwk
  bun run build:wasm:smplx
  bun install
  git apply ../examples/allowance-humid/humid-allowance-fixes.patch
  bun run build
)
The patch lets Humid build this contract's withdrawals. If git apply reports
patch does not apply, see REFERENCE.md, "Building Humid".
You should see bun run build finish by writing humid/dist. If it stops with
No compiled lwk wasm at … or No compiled smplx wasm at …, that module's build failed.
Run the command the message gives, from inside humid, and read its error, which names
the missing tool.
11b. Load the extension in your browser
Open chrome://extensions, turn on Developer mode, choose Load unpacked, and
select the humid/dist folder inside allowance-web.
You should see Humid listed and enabled. Then reload the allowance page, because the browser adds the extension only to pages loaded after it.
Click the Extensions button (the puzzle-piece icon) in the top right of the browser and select Humid to create a wallet. Don't switch to another application during setup, because the setup window closes. If it does, open Humid again and start over. Humid then shows a new recovery phrase, so write down the new words and discard the old ones.
Press Create wallet, write down on paper the 12 words the Recovery phrase panel shows, and press I saved it. Enter the three words it asks for, and press Continue. Then enter a password twice and press Create wallet.
You should see Humid's account panel, with a network menu reading Liquid at the top left, a balance, and Receive and Send buttons.
Switch Humid to Liquid Testnet
Humid starts on Liquid mainnet. Open the Liquid menu at the top left of the panel and select Liquid Testnet.
Press Receive.
You should see a confidential address starting tlq1,
the Liquid testnet form.
Fund Humid now, so its coins can confirm while you set up the page: use the
Liquid testnet faucet to send testnet coins to that
tlq1… address, not to the page's wallet.
You should see the payment in Humid within about a minute, marked Pending.
11c. Fund and withdraw through Humid
Select Humid extension under "Who signs". The page's own wallet and key sections disappear, along with the results from Steps 4 to 10. Then press Check for Humid.
You should see Humid is available on this page.
Press Get my key from Humid. The first call opens Humid's Connect this dapp? prompt;
press Connect. REFERENCE.md, "Sessions and prompts"
explains when the connect prompt appears again.
The call behind Get my key from Humid
You should see 64 hex characters under "Who signs", which differ from Step 5's. The page also puts them in the Beneficiary's public key field on the I'm the benefactor tab.
From now on, every press of Fund or Claim opens Humid's own Perform a contract
action? confirmation, which describes the transaction. Its button reads Sign and send,
or Sign for a dry run.
Repeat Step 6 to compile with this key. Humid spends only confirmed funds, so wait until the
payment from 11b shows Confirmed in Humid. Then set the amount to lock as in Step 7, press
Fund, and approve it in Humid with Sign and send.
The call behind Fund in Humid mode
await invokeHumid("processConfidentialTransaction", {
manifest, contractSources: { "./allowance.simf": source },
action: "Fund",
params: { BENEFICIARY_KEY, ALLOWANCE_AMOUNT, MIN_DISTANCE, amount_sat },
broadcast: true,
});
Humid's response carries txid, feeSats and transactionHex, with broadcast: true
once Humid has sent the transaction. With Broadcast for real cleared, the page sends
broadcast: false, and Humid signs the transaction without sending it.
REFERENCE.md, "processConfidentialTransaction"
documents the call.
You should see Humid broadcast the funding transaction. and a txid. Press Refresh
status on the I'm the beneficiary tab to see the new instance.
Then withdraw until the allowance closes. Humid sets the fee for each withdrawal and pays the withdrawal to its own change address, so this mode doesn't have a payout field. On the I'm the beneficiary tab:
- Wait
MIN_DISTANCEblocks, until the instance's button reads Claim. - Leave Dry run cleared and press Claim.
- Confirm the page's summary, which names the action, the instance it spends and its balance.
- Approve Humid's
Perform a contract action?screen with Sign and send. - Repeat from 1 with each new instance, until you've claimed the
FullWithdraw.
You should see PartialWithdraw broadcast by Humid. or FullWithdraw broadcast by Humid.
with a txid for each withdrawal, and No live instances at … after the FullWithdraw.
Reporting problems
If a command fails with a message that isn't in REFERENCE.md, "Errors and what causes
them", open an issue in the
simplicity-lang-org repository
with the exact error text and the step you were on. If you're an AI agent running these
steps as a test, follow your own instructions instead.
Next steps
Read EXPLANATION.md next. It covers what the contract enforces, and
who signs and what that changes. Before you adapt any of this for real funds, read
EXPLANATION.md, "What a mainnet deployment
would require".
To adapt a component for your own contract:
- The tests.
examples/allowance-simplex/README.mdhas ten more tests to write yourself. Most check that the contract rejects an invalid withdrawal: one signed by someone other than the beneficiary, one that takes more than the allowance, or one that tries to change the covenant's terms. Most of what they need is in the two tests from Step 2. - The manifest.
EXPLANATION.md, "Writing a manifest for a different contract" shows how to derive a manifest from any contract's source, andEXPLANATION.md, "Checking a manifest you didn't write" covers reviewing one, including one an AI assistant drafted. - The page.
examples/allowance-lwk/README.mddescribes its seven parts in order, with the wasm ownership rules for editing its library calls. - The indexer. Step 8 shows its core logic: two Esplora calls, the depth arithmetic, and the balance comparison that picks the action.
To run an allowance between two people, each with a separate browser, see
examples/allowance-lwk/README.md, "Running it as two separate
parties".
For other clients for the same contract, including a command-line one that runs it without
a browser, see REFERENCE.md, "Other clients for the same
contract".